 Install Heater with Lots of Elbow Room. You can place the heater in a closet but remember you need to keep it free from anything within 2 feet of the front and 1 foot on each side plus clear air above it. Not only to you not want anything flammable leaning against it you need room to service it. You should place the unit at eye level so that it is easy to service.
- Use Category III Stainless Vent Pipe: Treat the exhaust pipe like any other chimney - after all it is a chimney with lots of hot exhaust gases going up it. In my opinion Z-Flex makes the best and easiest to use Cat III SS Vent Pipe.
 Follow All the Rules for Black Gas Pipe installation: Key rules include: a shut off valve at each appliance, sediment trap (drip leg), do not under-size the pipe (use 3/4 inch pipe); be sure to test for leaks!; and use flex pipe to connect appliances to the black pipe (this isolates movement, hence, potential leaks).
 Follow the Instructions for Connecting to the Water system: The critical things are a relief value on the hot water side of the heater and water shutoff on both sides of the heater - one for hot one for cold. Also if you are using the newer plastic pipe for your water system, you should not connect it directly to the heater - most suggest a buffer of 2-3 feet of copper pipe. You also need a drain near by where the relief valve can drain and where you can drain the water to when winterizing the cottage.
 Use Clean Water: This is especially important for the Cottage. Be sure to install all your water purification systems in the line before the heater.
5 More Rules for Installing Tankless Water Heaters
There are lots of rules - but for good reason - to keep you alive!


11 Rules for Venting a Tankless Water Heater (Gas)
 As I discovered there are many rules as to where you can not install the exit of an exhaust vent for a tankless water heater. These, as much as any other criteria, really determine the ultimate installation location of the heater.
- Terminating an exhaust vent under a deck is not permitted - this is the one that really hurt us!
- 36 in (twin pipe installation) directly below or 12 in horizontally from an opening; operable windows, doors and any non-mechanical fresh air openings
- 24 in below a gutter, sanitary pipework or eaves or12 in where they are protected by metal shielding
- 12 in from any internal corner or external corner
- 12 in above ground or snow pack
- 7 ft Above a paved sidewalk
- 24 in from an opposing wall or structure facing the vent termination
- 60 in from the relief valve of a gas regulator
- 48 in from a vent terminator facing another vent terminator or 60 in vertically between two exhaust vent terminators on the same wall or 36 in Horizontally between two exhaust vent terminators on the same wall
- 36 in horizontally and vertically from combustion air inlet of a twin pipe system
- 6 ft From the gravity combustion air inlet any other equipment
6 Criteria for Sellecting a Tankless Water Heater
 The are a six key considerations when selecting the right size and type of tankless water heater:
- Hot Water Requirements: Your hot water requirements are directly proportional to the number of people in the cottage at the same time and your normal usage of water. For instance, do you wish to have two people showering at the same time (in different showers....), or will you have a dishwasher, and other appliances that need hot water. Generally speaking a shower need about 3 to 4 gallons per minute of hot water. So for two showers your water heater needs to supply about 7 gallons per minute. The more capacity needed the more expensive.
- Single Application versus Whole House: Do you only need to supply hot water to a single appliance, or do you have two or more locations (kitchen, bathroom, laundry room, etc...) that need hot water. There are single application tankless water heaters that would fit in a cabinet in a bathroom that can be dedicated to providing hot water to the shower only. But for most needs a whole house water heater is the ticket - that would be installed in the basement.
- Heat Source (Electric versus Gas): Electric is a bit more convenient as it required no venting, however, it requires a high AMP circuit, often 120 AMPs, and even the largest of residential systems can not provide enough water for one application. Furthermore, it is recommended that they be install close tot he electrical panel. Gas while more complex just simply provide more hot water and are a bit cheaper to run.
- Heat Source (Natural Gas versus Propane): At the cottage it is like you will have no access to natural gas so the choice will be propane. Just be sure to order the LP or propane version - the natural gas model won't work properly with propane.
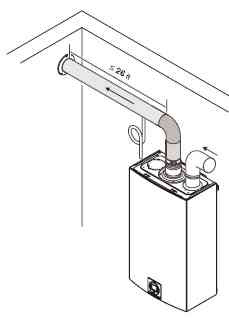 Venting Type - Open combustion installation (SINGLE PIPE SYSTEM) versus Room sealed installation (TWIN PIPE SYSTEM): In an open combustion installation only the exhaust vent is installed to the outside - the system pulls in air from the room the heater is installed. For smaller systems this may not be a problem but for larger systems - like the 2400ES that we are using - it requires a room the size of entire single floor - which we don't have. PLUS you can't use the single pipe system in a region which has cold climate - which we do. Twin pipe systems usually come with a direct air vent system that uses an internal fan to pull in and push out the air. Quite frankly I feel safer with the direct vent two pipe system!
- Venting Location (Vertical versus Horizontal): The exhaust and air intake can either be routed vertically through the roof or horizontally through an adjacent wall. Which you do depends on a number of factors but the key ones are: location of the heater, the acceptability of the exit point per building code. We used a vertical vent for the exhaust and a horizontal for the intake because 1) you can not vent under a deck - and our deck goes almost completely around the cottage, 2) we wished to place the unit centrally to serve all locations equally, 3) the one wall that was available we did not wish to place the heater there


5 Reasons to Use Tankless Water Heaters
 We have decided to use a tankless water heater to supply hot water to the Cottage. The reasons were very simple and logical:
- Small footprint: A tankless water heater is much smaller that an equivalent water heater - in fact they just hang on a wall.,
- Inexpensive to run: Because there is no tank of water to continuously keep hot, you are not paying to heat water when you aren't using it.
- Instant and endless hot water: The model we got, a Bosch 2400ES, provides water for two major applications. It will keep providing hot water forever or until our propane tank runs out of gas... So nice long showers are possible.
- Easy to Install: It is no harder to install than a tank water heater, in fact perhaps a bit easier, as it is just hung on a wall, and could go just about anywhere.
- Easy to Winterize: Because there is no water tank winterizing is easy. Draining the water pipes also drains the water heater. Plus there isn't 40 gallons or more to drain - just the water in the pipes.
Installing the Septic System - Status
 Oh Yes! an Update...
Two weeks ago Doug Zacharias of Doug Zacharias Trucking Ltd installed the septic system. No pictures of the work except for the entry though the wall, but I will discuss the system that was installed in future posts.
Here you can see the 4-inch pipe leading to the septic tank coming through the concrete wall. It is sealed into the wall using a bit of spray foam.
As you know the expression is "Sh#t flows down hit", hence this pipe is not level but slopes down at a rate of 1/4 inch per foot.
Framing the Basement... Status
 The massive amount of rain in the month of July caused me to change the order of construction activities. Not able to work outside, I moved the framing of the walls in the basement much early in the schedule. In fact I had thought that it was a task that I would leave to next spring - concentrating solely on getting the main floor completed. But with time on my hands, I ordered more 2x4 lumber and framed the basement walls.
In the basement there will be:
- 2 bedrooms
- a laundry closet (in one of the bedrooms)
- a utility room, and
- a bathroom
Given that it was the basement with 8 inch concrete walls I chose to construct 2x4 walls. Remember that the walk-out side of the basement has already been framed using 2x6 pressure-treated lumber - it is not a concrete wall.
I am realizing some benefits of completing the framing:
- I can now have my electrical contractor install the electrical in the entire house now, saving a second trip and money
- I realize now that I would have had to put up a few walls anyway to hold the electrical service, the tankless water heater, and the water pressure tank.
- I now can better plan for the routing of the plumbing from the main floor in the basement ceiling.
Spray Foam, Petroleum Jelly and Nozzles
 The use of the petroleum jelly is critical. Without it the gun would rapidly become non-functional. Illustrated here is a used nozzle with the spray foam curing in it. The tube contains about 4 squirts of petroleum jelly.
3 Reasons to Frame First then Spray Foam
 The critical trick to framing when you intend to use spray foam as the barrier between the wood and the concrete wall is to create a gap between the wall and the framed wall. We use at least a 1/2 inch gap but his would increase in areas where the concrete wall was perhaps not as plum as we would have hoped.
Why not put the spray foam first, and then frame the wall?
There are 4 basic reasons:
- The spray foam would create a mess on the floor which you would need to clean before you install the wall
- The spray foam if in place first may stick out further that the 1/2 inch gap needed, hence, make installing the wall a real pain
- We would like to seal all the gaps behind the wall studs, and any awkward spaces your framing causes at the corners - you can only do this if the wall is in place.
6+ Spray Foam Tips and Tricks
 While the overall process was easy, getting the right thickness of material, and covering all the area took some trial and error. Not a big deal actually, because mistakes just meant that I sprayed more foam than required and that it didn't look pretty. All my initial mistakes were all still very functional.
Here are some tips:
- Plan out your work flow. Make sure ALL of the surfaces you are going to spray are unobstructed, and if you are going from one area to another you can easily move. Time is crucial as you will come to understand.
- Change the nozzle tips if you stop for 30 seconds or have been spraying constantly for 5 minutes. The instructions state 8 minutes but I found that the performance was better if I switched them out sooner. The issue here is the foam hardens in the nozzle at the same rate as on the wall so eventually the nozzle will plug up and do all kinds of nasty stuff to the gun. The hose is only about 8 feet long so I found that the area I could do from one location consumed just about that time - so I changed nozzles every time I moved the tanks. Strategically place the spare nozzles and petroleum jelly packets along your work path.
- Ease the gun trigger on - don't pull it hard and fast. About half trigger at the beginning is all that is required, or you will get too much material and have a lumpy result.
- Use a medium speed movement from top to bottom and then back again rather than side to side. Use smooth long strokes rather than jerky short ones.
- Don't fix minor missed areas immediately. I found I used less material in a wasteful way if I ignored my minor mistakes and came back to them later in a second pass.
- Use the right nozzle for the right job. Use the fan nozzle for the wide areas of wall and the cone nozzles for filling cavities.
- Make sure your whole face, hands and arms are covered buy the goggles, respirator and suit. While not toxic the over spray, and there isn't much, is a real pain to remove. I promise you you will lose hair...
- Open all the windows and doors to completely ventilate the area.
Tiger Foam... The Spray Foam Kit and its set up
 The Tiger Foam Kit I purchased is a Tiger Foam 600 bd. ft. Kit - FR. It was shipped in two boxes as seen in the previous post.
The kit comes with:
- One tank of chemical A
- One tank of chemical B
- One hose and gun assembly
- 6 fan nozzles
- 4 straight nozzles
- Tubes of petroleum jelly
- Gloves
 I also ordered extra nozzles, the Tyvek hazmat suit, and a Tiger Foam Particulant Respirator.
To that materials and tools list I added:
- Goggles
- A box knife
- A clean cloth rag
- Warm up the two chemical cylinders in the sun for about 4 hours. This is key to getting the system to work properly and to deliver ALL of the material in the tanks. The system works best between 75 and 85 degrees F - or when the tanks are warm tot he touch.
- First get your self protected.
>Put on the Tyvek suit
>Install the air filters in the respirator
>Adjust the respirator so it has a tight air seal around your face
>Put on your goggles and gloves - Take the tanks to the location you will be using them
- Plan out your spray foam operation
- Connect the hose to the tanks (red to A and black to B) - make sure the connections are tight
- Put a lump of petroleum jelly on the gun, and then snap on the nozzle you need - I used the fan nozzle 99% of the time.
- Test the gun and nozzle...
- The 600 bdft kit was just he right size to spray foam the basement. I had hoped to have some left over to do windows and doors but that didn't happen
- I use the fast rise version because I was predominantly spraying on the walls rather than spaces
- Be sure to read ALL the instructions as there are plenty of tips and trick to make the job go way and to not waste material.
Tiger Foam... Doing Spray Foam the Mike Holmes way...
 A critical element of framing a basement is creating a water barrier between the wood framing and the concrete wall. This can be done in a number of ways but the most common is to use a 6 mil vapour barrier.
Another emerging approach is to use a 1-2 cm foam coating on the concrete wall. This is the approach we used. Incidentally, this is also the favourite practice on the TV renovation show "Holmes on Homes".
The spray foam approach is not inexpensive but is definitely superior to the 6 mil approach in a number of ways:
- Save on heating and cooling as spray foam provides added insulation - about R-7 value per inch of thickness
- A better seal against moisture and air as it creates a complete vapour barrier behind and integrated with the wall framing
- They have two sizes(200 & 600 BD ft) and two types (fast & slow rise)
- They ship next day in most cases
- Gave a quickie lesson on how to use it with important tip on the phone - when I ordered - AND maintain a call line for support
- The kit and instructions were simple and very easy to use.
- Provided all the accessories like the HASMAT hooded suit and air breather
- The Tiger Foam 600 bd. ft. Kit - FR
- How to use the spray foam kit
- Tips on DIY Spray foam
Hazmat Suit to the rescue...
 Yes I used this suit in the construction of the Cottage...
... and in fact for a very crucial part of the construction. Can you guess why I needed it as well as the breather beside it?
In an up coming post I will describe why....
The beauty of folding cranks...
 I almost lost the battle for casement windows to double hung windows at the beginning of the project.
Even thought casements are more energy efficient (less drafty), require less maintenance,, provide more air movement in the summer, and are less expensive, it was a tough battle!
 I discovered it was the offending crank that was the downfall of the casement window in th eyes of my wife. Fortunately they now make folding cranks so the key problem of the crank... getting in the way of blinds is mitigated dramatically.
It also helped that absolutely everyone we discussed windows said that casements were the way to go! And that the architectural design of the Cottage called for them...
Securing the Cottage...
 I key milestone and a nice feeling is reached when the windows and doors are finally in.
At this point:
- The roof is finished and shingles, and
- the entire cottage exterior is covered in a waterproof sheet - that is the Tyvek stuff I discussed in an earlier post.
There is also a mental milestone when you have installed locks on all of the doors. It means that who can lock the door when the construction ends for the weekend.
3 Steps to installing an Oval Window
 I expected that installing an oval window would present some unusually challenges.
 On the contrary the installation was quite easy. The different shape did not make it any more difficult. In fact because the window was the smallest it turned out to be the easiest of all of them. This was many because it was the lightest of them all.
Three step's to Oval window success:
- Make sure you frame the window opening the right size. The trick is to make sure the window opening is 3/4 inch bigger that the size of the window. The framing is exactly what you would do for a rectangular window of the same height and width.
- Leave the exterior sheathing in place until you receive the window. That way you can use the window itself as the template to mark the cutting oval for the window.
- Use the window itself as the template for your cutting line. Cut the window opening in the sheathing to 3/8 on all sides.
- Order the window with a nailing flange. Once the window is placed in the newly cut opening, center it horizontally and vertically and securing it is easy with the nail flange.
- Use spray foam insulation to insulate around the window. This makes sure the odd shape gets insulated well.
What do you think?
5 Options to include which make Installing Windows Easier
 Two weekends ago we installed the exterior windows and doors. I had them manufactured by Bonneville, ordered of course through Dale's Home Hardware Building Centre in Otter Lake.
The windows are great! Terrific quality at a reasonable price.
Installing windows is at least a two-person job, and if the windows are big, like ours, then consider three people to do it!
Here is a few tips I learned through the process of ordering and installing them:
- Fit your wall thickness: Our stud walls are nominally 2x6, hence 5 1/2 inches, but to do it right you need to take into consideration other building material that affect the thickness of the finished wall. for instance the exterior sheathing is 1/2 inch and the drywall on the inside is another 1/2 inch. If you are putting lath on the outside to separate your siding from the wall then you need to add about 3/4 inch more.
The whole purpose of getting the right thinkness of window is to make it easy to finish on the inside. Witht he window structure ending flush with the drywall on the inside installing the finish is just a simple nail on affair! - Add a Nailing Flange: An option to consider is adding a nailing flange on the outside of the window. This again is added in the manufacturing process. In makes installing the windows extremely easy. You still have to shim the windows but all the securing is done by using screws from the outside of the window. No blemishes on the inside of the windows.
- Add Factory Brick Moulding: We are installing vinyl siding, hence, we added the brick moulding feature. This eliminated the added step (and a whole lot of time) in installing J-trim around a window to hold in the ends of the horizontal siding. In essence, it has the j-trim already built-in.
- Get 100 % Vinyl: Our goal is a near maintenance free Cottage. I have no interest in painting windows every 5-years. Plus the vinyl is all seamless so there is less chance of leaks - they actually melt the corners of the windows together!
- Energy Conservation: Go for as much energy conservation in the windows as you can afford. Windows are one item you can't update without replacing them and the incremental cost is peanuts. We added low-E and argon. Low-E adds a coting to reflect those bad UV rays and argon provide better insulation value.
The Importance of Scaffolding!
 I can't over emphasize the importance of scaffolding!
In fact once we had gotten the scaffolding for the siding installation, we realized that we should have gotten it much sooner to assist in many of the previous tasks. It would have made the following much easier and safer:
- Roof truss loading and installation
- Building of the deck substructure
- Installation of the beams for the gazebo and the front porch.
Adric is also wearing a safety harness with the harness tied of to a secure spot on the Cottage.
Doing anything on a slope is very difficult with a ladder, an extension ladder or even the fancy ladder that handles slopes that I mentioned in an earlier post. You are constantly moving and stabilizing the ladder - plus you need two. With scaffolding you put it up once, and only need to move the platform up as you move up the wall. In this picture you can see that we used two platforms. I still love my "World's Greatest Ladder" but the scaffolding is better suited when two people need to install long / big pieces of material at a height.
RECOMMENDATION: If I did it again I would get the scaffolding much earlier, I would get 4-foot scaffolding, and I would get more scaffolding. The scaffolding you see here is 2-feet wide by 5-feet tall, and is only 10-feet long. When the highest platform, shown here between the third set of scaffolding, the 2-foot platform just seemed a bit narrow. I would get three more side pieces and the associated braces so that the platform could be longer and hence would not need to be moved as much.
First to sleep in the Cottage
 My middle son, Nathan, was very quick to respond to installation of the exterior windows and doors - which happened on August 2nd. He moved his tent and sleeping bag right into the soon to be living room of the Cottage.
He had to boost, of course, the next morning that he was the first to sleep in the cottage...
Roof is ON!!!!
 The entire roof - sheathing and shingling was completed on August 4th.
The shingles we ended up using are a style called Cambridge 30. the '30' specifies the warranty period. The colour is national Blue. These shingles are made by IKO Canada. This style of shingle simulated the look of cedar shakes - we are very happy with the look!
Also in this picture you can see that two roof vents and two waste pipe vents were installed.
The waste vents actually don't connect to anything yet - they are just 3-foot pieces of pipe just to fill the waste vent flashing that was installed. The interior vent pipe will be installed and connected when the plumbing goes in.
The roof vents we used are called 'Maxavent'. It is very important to understand how attic cooling happens and that you install the right kind of and right size of roof ventilation for your roof. A single story at this cottage is 840 square feet so we used two vents installed right at the top. The second part of the venting system is to ensure there is sufficient air flow in to the attic from the bottom edge of the attic. We accomplished this by using vented sofit around the entire roof.
Rain, Rain, go away...
 A project status of sorts...
I have been on vacation, and working up at the cottage this past week (August 1 - 10). It may look like a lot of progress has been accomplished, since the last time I posted (basically I posted the last 12 days of posts - 12 days ago...), however, I haven't gotten where I was hoping to be.
There were primarily two reasons: Rain, and late deliveries of materials... But rain is turning out to be the biggest obstacle to progress. It has rained almost every day at least in part. Let me give you some examples:
- The roofing contractor gave a quote of 4 days - it took him over 14 days in elapsed time to accomplish the work
- Out of the past 9 days I perhaps was able to work a total of 5 days
- During the previous weekend - long weekend as I go up on Fridays - I maybe was able to get one full day of real work in.
This is a summary of the status:
- All the framing of walls on the inside - both floors is complete
- The gap between the framed wall and the concrete in the basement has been spray foamed (more on this in a future posts)
- The roof is on and shingled, including two vents have been roughed in - the chimney will be installed in September.
- The stair landings have been roughed in - but no stairs yet.
- All the exterior doors and windows have been installed - but they yet need to be spray foamed to seal them
- Approximately one-half of the cedar deck has been installed
- The septic system has been installed
- Siding has been installed on half of the east wall - with start strip installed on the rest of the east wall and on the front wall.
Open & Closed... Sheathing the Roof
 Last weekend only half of the roof was sheathed. The rain in the Otter Lake area has been phenomenally frequent this year. It has rained everyday, often twice or three times a day - hence, it has been difficult for the roofing contractor to get any headway on the roof.
This first pictures is looking up from inside the main floor towards the lakeside of the Cottage. Lots of roof trusses but no sheathing yet.
 Fortunately, they have been able the sheath the front half of the roof. You can still see a bit of sky yet as the shingles and flashing are not yet on the roof.
ASIDE: if you look closely you can see some of the lateral bracing - between trusses - that we installed. Most of that braced is called for by the instructions provided by the truss manufacturer, however, we did ad a bit more. Most of this added bracing was as a result of bracing we used to steady and secure each truss as we added them. In most of the cases we just left them in.
Fascia Board - Finishing the Roof Framing
 The fascia is the board that is nailed to the outer-most ends of the roof trusses. It provides a nice finish and more support tot he roof. The roof sheathing is nailed down staring at this board.
In the picture we are looking almost straight up the front wall of the Cottage at a corner, so you can see how the fascia is squared at the corners.
Once the fascia is covered with a vinyl flashing the soffet will be install from the inside edge of the fascia board over tot he top of the wall.
But that isn't for a week or so...
Building Smart - order is Important!
 With good planning it was easy to reach spots like the main floor walls or even the roof without having to use ladders or even scaffolding.
Here the completed deck substructure covered with some spare pieces of plywood served as a ready-made scaffold. This allowed us to move around quicker and to use stepladders rather than extension ladders or scaffolding.
Where getting even higher was necessary, just adding one layer of scaffold was all that was needed.

Not one Nail in all of the Roof Trusses
 It is amazing!
There isn't one single nail in all of the trusses as they arrived from the manufacturer. What holds the various element of each truss is these nailing plates which are pressed into place at the factory. There is of course different sizes but the design is the same for all of the nail plates.
These connectors have greater strength in the same plane as the truss but any other direction it is quite weak. We discovered this when we were heaving the trusses up on the framed walls. We had to be sure to support the trusses as we slid them up on to the walls.
Basically the process to get the trusses up on the roof, when a crane is not available is to put one end up on the wall and then slide the rest up by shear muscle power. The trusses are all laying flat during this procedure, and prone to bending right at the nailed plate joints - so careful support during the process is needed.
We were fortunate to have only broken one of the trusses and it was a minor fix to get it back into the right shape.
Hurricane Clips! What Hurricane?
 The roof trusses were secured at each of the outside, and load bearing walls, with something calls a hurricane clip.
The purpose of the hurricane clip is as the name suggests to hold the roof down in a big wind. The trusses could actually be toe-nailed in place, and hence not move around. However, this is not sufficient when the wind blows...
The uplift under the eaves during strong wind could be strong enough to rip off the roof.
Lots of Shingles, and I mean LOTS of Shingles....
 This week my roofing contractor is 'doing' the roof.
He is taking this pile, actually two piles of shingles - there is a smaller one behind -- and nailing them to the top of the roof.
Actually I have contracted him, and his crew to do a bit more than just shingling:
- Install the roof sheathing - which is usually 1/2 inch plywood
- Do the on site building of some parts of the roof - for instance, the cricket which crosses the valley between the main roof and the gazebo roof. This is necessary to create a watershed effect to drain water to each side of the roof.
- Install the fascia board, that is the board around the outside of the roof edge.
- Install the chimney, which includes the ceiling support, the flashing where the chimney goes through the roof, inserting the insulated chimney components, and the chimney cap.
- Install the waste vents, there will be two.
- two roof vents
 The style of shingles we are using is called Cambridge 30. These are a little different from the standard three tab that are the stable of most roofs, but once installed produce a 'cedar shingle' appearance. The '30' means they are guaranteed for 30 years. The colour is called 'National Blue'.
Unfortunately the Cambridge style can not be used for the caps along the roof hips, nor as the starter strip. So an additional 12 bundles of the standard, 3-tab style, in this case called Aristocrat (not shown) are also required.
 Valley flashing will also be installed in each of the roof valleys. A roof valley is the place where two roof sections come down and join. The valley flashing comes in 10-foot sections. I was surprised when they arrived rolled up.
 Here are the two roof vents, waste vent flashing and chimney support kit patiently waiting to be installed...
Hanging on at 45 Degrees
 Part of the deck is at a 45 degree angle to the Cottage. This means that the deck joists will be at a 45 degree angle to the ledger board. hence standard joist hangers, at 90 degrees, just won't work.
The solution is to use joist hangers that have a 45 degree angle. The picture illustrates the ones that we used. These were actually made of heavier material than the standard 90 degree ones.
You probably have noticed that these hangers seem a bit smaller - and they are. Technically the 45 degree hangers I used are for 6- and 8-inch joists, so I shouldn't be using them solely to hold the 2x10 joists. To strengthen the joint I added three 3.5-inch framing nails above the joist hangers.
The material on the deck is temporary decking of plywood so that we could use the deck to access the main floor walls, assemble the gazebo trusses and install the tyvek.
Pinning that Post
 We used two ways to secure the deck posts on top of the concrete piers. The first ways is illustrated in this picture.
Basically a hole is drilled in the bottom of the post, into which the anchor bolt sticking out of the goes into. The trick is making sure the hole is deep enough, or shall I say high enough for the pin (that's the bolt) to completely fit into.
When raised and siting on the "pin" the post just isn't going to move.
So what is the black stuff on top of the concrete pier?
There is building code requirement, and just smart practice, to isolate the dampness of concrete from any wood. We did a similar isolation between the concrete footing and/or wall from the wood walls by using something called a sill gasket. Here, it is generally accepted that a piece of tar paper is used to isolate. We used an asphalt shingle - cut to fit.
Building a Roof by the Labels
 The trusses came with a set of plans and drawings. The drawing helped to decide what order the trusses needed to be assembled.
The drawings also indicated where to place additional bracing. Bracing between and among the trusses is very importsant to provide that additional lateral stability and strength to the roof.
In addition, the truss builder, Kent Trusses, placed stickers on the chords where the lateral bracing needs to go. "Chord" is truss lingo for the wood beams between the foot (bottom) and other parts of the truss.
 There were stickers to indicate which trusses to laminate. "Laminate" is more truss lingo to indicate that two identical trusses need to be nailed together to build a thicker, stronger load bearing truss.
Not shown, was a third sticker to indicate the exact location on a truss where the load bearing wall needs to be.
And to make it even easier the stickers were colour coded:
- Green for "Brace"
- Blue for "Laminate"
- Yellow for "Load Bearing"
Beam me up Scotty!
 Pardon the Star Trek phrase...
The deck for the gazebo is sixteen feet in diameter, and to create a clear space under the deck - with no supporting beams in the middle - the major beam under the center of the deck needs to be almost sixteen feet long.
That calls for one massive beam and the supporting posts to support it. With a deck this size a lot of people could be on the deck at the same time - like 20 or 30 or more...
We laminated the beam using four engineered LVL beams. Each beam was 1.75 inched thick, 12 inches high, 15 feet 8 inched long, and was supported at either end by an 8" x 8" pressure treated post.
The external end of the beam is secured to the post using steel straps (missing from the picture) as well as to the two adjacent posts on either side via a beam connected with a joist hanger.
 The cottage side of the beam will also be secured to its post using steel straps (missing from the picture). The post rests on a concrete pad buried four feet in to the ground, and is secured to the cottage framing using countersunk eight-inch lag screws.
Stairway to Heaven!
 Up to this weekend getting up into the Cottage was either a running leap onto the front porch or using the small step ladder as a makeshift stairs up to the porch. Both or which were difficult when you are carrying tools or materials.
... Plus using a step ladder like this isn't exactly the safest way to use a step ladder - they even print warnings all over the step ladder to this effect.
And the stairs kept disappearing when someone needed to use the step ladder...
So I broken down this weekend and built a set of temporary stairs. It was quite easy really! I cheated a bit by first buying a set of pre-cut stringers - three in fact. Stringers are the supports for the boards that are used for the steps themselves.
 My my quick and dirty steps have six steps, and except for the pre-cut stringers were made from strap lumber I had. I made the steps 36 inches wide using a combination of a 2x4 and a 2x6 for each step. Scrap wood was used to level and support the bottom of the stringers, and I secured the tops of the stringers to the beam of the porch using a few 3.5 inch screws for each.
With another piece of scrap lumber secured to the posts at about 36 inches, I have a completed stairway. And it only took about an hour to do it.
Just in the nick of time as well... and I have to confess I had a second reason for the stairs. My Mom and Dad came up for a visit on Saturday. My Dad has been very curious on how the work was progressing, and I guess he just couldn't wait any longer...
That is the second reason. My Dad is 8 months short of being 80 years old, and while still quite active, I thought having the stairs would make his tour of the cottage so much more enjoyable.
Subscribe to:
Posts (Atom)