The video comes in eight parts - this is part 6. In this video we get a tour of the tankless water heater and the rest of the basement.
Showing posts with label Tanklless Water Heater. Show all posts
Showing posts with label Tanklless Water Heater. Show all posts
Cottage Tour... a Year Ago... Part 6 of 8
A year ago, just before the plastering of the drywall started, I did an impromptu video walk-through of the cottage. While reviewing the picture album up on Picasa I revisited these video, and wondered why I did not share them back then. So I intend to fix that oversight by uploading them now.
The video comes in eight parts - this is part 6. In this video we get a tour of the tankless water heater and the rest of the basement.
;-)
The video comes in eight parts - this is part 6. In this video we get a tour of the tankless water heater and the rest of the basement.
Installing a Tankless Water Heater
 Installing the tankless water heater does require some expertise in assembling gas and water fittings. While installing pex is reasonably easy, these two taskes are certainly not in the realm of your everyday DIY'r.
WARNING: Not doing the gas piping right could be very dangerous and in many jurisdictions requires a certified professional to do the installation or at least test it BEFORE first operation.
But there are a few things you can do to make the job easier.
1) Use Pre-fab Pipe
Most of the big box home improvement stores will have all the black pipe materials in various pre-cut sizes and lengths that you need for this job so doing any cutting of pipe can be avoided or eliminated entirely. The stores will have all the pipe, values, nipples, T's, safety values and other parts. JUST BE SURE TO GET GAS RATED PIPE AND FITTINGS!
While black pipe is adequate for the gas pipe I recommend getting either stainless or galvanized for the water lines.
2) The Gas supply line
You will need to get and route the appropriate size (diameter) gas pipe from your outside source point to the hot water heater. The perfect pipe for this is the corrugated stainless steel tubing (csst) as that manufactured by Gastite. The material bends around corners similarly to PEX so you can run one continuous pipe without elbows. The only connections to be made are at the outside wall (to connect to your gas source) and at the water heater. THESE TWO CONNECTIONS ARE CRITICAL SO ONLY PROFESSIONS SHOULD MAKE THESE.
Using this corrugated pipe eliminated any of the work associated with running and connecting the black pipe normally used for the task.
3) Use the right tools
You simply must have the right tools to tighten these connections. A good set of pipe wrenches is essential.
4) Use plumbers putty
All the fittings must use the appropriate gas-rated putty for sealing the connections.
5) Testing is Absolutely mandatory
You need to test all the fittings for leaks using a soapy fluid.
Related Posts:
Installing Propane Gas at the Cottage
11 rules for venting a tankless water heater (gas)
3 reasons to use corrugated stainless steel tubing (csst)
;-)
![Reblog this post [with Zemanta]](http://img.zemanta.com/reblog_e.png?x-id=162cf8b0-b153-4ac3-b1cc-a61b06ad2b3d)
We Have Water!
Over the past two weekends I completed installing all the water systems and tested it. The pump in the lake started with no problems, and other than a few loose connections there were no leaks.
I discovered that the shower faucet is not working properly so this coming weekend the task of fixing or replacing that is a high priority.
I also install a reverse osmosis filter under the kitchen sink... and it all appears to function without a problem.
I took water samples from before and after the reverse osmosis filter to test the potability of the water.
Coming Up:
In the next few posts I will explore:
Cottage on the Edge: Installing the Water Pressure Tank
Bosch 2400ES Tankless Water Heater: Sneak Peek
Installing the Water System: Materials Purchased
Installing the Tankless Water Heater
11 Rules for Venting a Tankless Water Heater (Gas)
6 Criteria for Sellecting a Tankless Water Heater
Cottage on the Edge: PEX versus Copper Piping: Pros & Cons
5 reasons to use tankless water heaters
;-)
I discovered that the shower faucet is not working properly so this coming weekend the task of fixing or replacing that is a high priority.
I also install a reverse osmosis filter under the kitchen sink... and it all appears to function without a problem.
I took water samples from before and after the reverse osmosis filter to test the potability of the water.
Coming Up:
In the next few posts I will explore:
- The structure of the water system I installed
- The filtering system installed
- The outcome of the water testing
Cottage on the Edge: Installing the Water Pressure Tank
Bosch 2400ES Tankless Water Heater: Sneak Peek
Installing the Water System: Materials Purchased
Installing the Tankless Water Heater
11 Rules for Venting a Tankless Water Heater (Gas)
6 Criteria for Sellecting a Tankless Water Heater
Cottage on the Edge: PEX versus Copper Piping: Pros & Cons
5 reasons to use tankless water heaters
;-)
Waiting for Spring...
 On Saturday January 3rd we passed the milestone of moving my furniture that was stored in storage at PODS to the Cottage.
We are not yet finished inside but sufficiently finished to accept furniture. This way I save the storage charges, thus freeing up cash to devote to the Cottage.
In the picture you see the garden bench I had in my garden in the front of the Condo I sold in May. ...and as the title suggests I can't wait for spring to enjoy it again!
Coming Up:
As you can see I have been away from the blog for a few weeks. The blog has been a casuality of the Christmas holiday and spending most of the time up at the Cottage doig the final touchs so that we could bring up the furniture.
Over the past three weeks we have accomplished much which I will share with you over the next few posts - possible a week of more of posts - I might even have to do multiple posts per day. We will see what my work schedule allows. We accomplished the following:
- Installed laminate floor on the main floor
- Installed vinyl floor in the main bathroom
- Installed the IKEA kitchen cabinets
- Installed the bath tub, the toilet and the bathroom vanity and sink.
- Completed the plumbing for the bathroom in the ceiling of the basement.
- Started the railing for the stairs downstairs.
- The taping and plastering of the drywall was completed, and primed.
- Painted the ceiling and walls of the main floor
- Installed the refrigerator and stove
- Installed the microwave oven
- The electrical was completed including all the baseboard heaters, switches, outlets, and light fixtures (some temporary)
- Started on the baseboard trim.
- Install the baseboard and window trim on the main floor
- Install the interior doors
- Complete the hand railings for the stairwell
- Install the closet doors on the main floor.
- Install the subfloor in the basement
- Paint the walls and ceilings in the basement
- Install the laminate floor in the basement.
- Finish connecting the plumbing in the basement
- Connect up the gas supply to the tankless water heater
Cottage on the Edge: 10 tips for packing a PODS Container - May 26, 2008
;-)
3 Reasons to Use Corrugated Stainless Steel Tubing (CSST)
 We roughed in the propane gas line the previous weekend. This was necessary so that we could frame and drywall the ceiling bulkhead in the basement.
We used corrugated stainless steel tubing (CSST).
We love the tubing because:
1) Easier to route
The tubing is reasonably flexible, so running the tubing through walls and the bulkhead was very eaily
2) Fewer Connections
Because it is flexible you can make tight turns. We actually have only two connections and those are the ones on either end: 1) the one shown in the picture - which is the external connection, and 2) the second connection will be to the appliance itself.
3) No Special Tools Required
We required no special tools. The connectors art each end are attached easily with just two pipe wrenches.
To find more about corrugated stainless steel pipe here are a few links:
- www.gastite.com - a manufacture of CSST
- Installation Guide from Gastite
- An alternative to traditional threaded black-iron gas piping
- Corrugated Stainless Steel Tubing: A Good Choice for the Short Run
I future posts I will be exploring my travels with installing the gas line and its connection to the tankless water heater.
Related Posts:
11 Rules for Venting a Tankless Water Heater (Gas)
Installing the Tankless Water Heater
;-)
Waiting for Hydro Quebec
 The Cottage is looking more and more complete on the outside.
This a picture that was actually taken two weekends ago. At that time:
- All the electrical was installed inside the Cottage, and the service mast stands ready for connection to the power Grid.
- I began the installation of the tankless water heater - you can see the air intake mid way on the front of the cottage.
- The exhaust for the tankless water heater has been installed
- The exhaust for the future clothes dryer has been installed
- A 1-inch corrugated stainless steel tube has been installed, and the external connection put in place and capped off.
- The external part of the chimney has been installed
- The cedar decking for the side and back decks have been installed
![Reblog this post [with Zemanta]](http://img.zemanta.com/reblog_e.png?x-id=2a951539-ede9-4e2a-b702-6bd6693b3c3f)
3 Tips for Communicating with Your Electrician
 My electrical contractor started this past Saturday. It is amazing how fast they can install the electrical!
They began about 9 am and were heading home at 3 pm after completing the electrical for the entire main floor. And that included telephone and cable.
They obviously have done it a few times before...
But I think some up front preparation on my part and great communication with the electrician helped make it easier for them. Here are a few tips I recommend:
1. Be Detailed in your Request for Quote
Good communication starts before the electrician even arrives. In my request for a quote I provided a layout of both floors of the cottage and clearly indicated where things needed to be. And that means everything! Often your architect plans will provide this. I needed to amend the plan however because (a) I am finishing the basement and b) wanted a different layout for the kitchen.
Being upfront means the electrician knows exactly what kind of material to bring including bath room vents, baseboard heaters, pot lights, etc...
2. Label the locations
The weekend prior to the arrival of the electrician, my wife and I did a walkabout in the Cottage, imagining where everything goes and discussing the various options. Once we settled on a location we stapled a label in the location.
This walkabout is particularly important to get the right location of the ceiling fixtures. Only you know where the dining room table is going or the kitchen island. Left to their own, the electricians are like to just centre the fixtures in the middle of the space - perhaps not in the location you would choose.
3. Be there on the first day
Plans are not exact, and the locations you picked may not be optimal or to code so it is important to do a walkabout with the electrician to confirm the locations and make adjustments. It is here where you can share with him why you choose that location. Plus your nomenclature for the labels may not be his - communication closes the gap.
Our electrician was amazed at the labels - I guess he doesn't often get such help from his clients. The walkabout went much faster because of it. He did make a few suggestions, and so we moved things around slightly.
4. Setup Key Plumbing Electrical Fixtures
The plumbing system has a pressure tank with a connection to the pump in the lake, a sewage sump pump, tankless water heater, and a UV Filter. All require 110 volts. It is real helpful to the electrician if these are at least installed in their locations. That way the electrician can install the required outlets in the right locations. Otherwise he may just put them in the 'area' not taking in to consideration the layout of these fixtures.
What other tips can you recommend when dealing with the electrician?
Bosch 2400ES Tankless Water Heater: Sneak Peek
 Here is a closer view and sneak peek at the Bosch 2400 ES Tankless Water Heater that we are installing in the cottage. In a previous post we described the rough installation we did to allow the electrician to install the electrical outlet for the heater.
As you can see from the picture it is not fully installed yet. There is lots more to do including:
- Cold and hot water connections
- Gas connection, in this case liquid petroleum (yes - Propane)
- Exhaust vent
- Air intake
COMING: In about two weeks we will be installing the water system to the water heater, and also the exhaust vent and air intake. The gas connection is planning to done in mid November
Installing the Water Pressure Tank
 Similar to the tankless water heater we also rough-installed the pressure tank for the water system. Again this early installation was done so that the electrician would know were to install the electrical connections.
By way of describing what you are seeing in the picture, here are some features of this pressure tank.
- The tank is over sized as I am recycling a tank which I initially had up at the cottage lot when I was powering by battery-stored solar generated electricity. With an oversized tank the pump works less and hence less draw on limited electricity storage. I will be using grid power but it still means I get great capacity
- All those wires and electrical looking boxes make up the controlling system for the pump. When the pressure in the tank drops to a certain level the controller tells the pump to send more water.
- The water intake is at that short pipe (ABS) stub about center of the picture.
- In the bottom left you see the exit pipe of the waste system to the septic tank.
- We built a stand to get the tank of the floor and at a manageable working height
- The pump is in the lake so we are employing a drain back system - that is so the water doesn't freeze in the pipe in the winter. The vertical grey assembly to the left to left of the tank and attached to copper piping connecting it to the tank is used to vent the pipe during the drain back operation.
Installing the Tankless Water Heater
 This past weekend, in preparation for the electrician, we rough-installed the tankless water heater. As you can see in the picture it requires 120v so we installed the heater early so the electrician would know were to place the outlet.
The beauty of this heater is that when we have completed the installation of the tankless water heater, we can just plug it into the wall outlet. The installation of the heater will include:
- Cold and hot water connections
- gas connection, in this case liquid petroleum (yes - Propane)
- Exhaust vent
- Air intake
- At least 12 inches from the the ceiling - we placed it about 14 inches
- At least 12 inches from the floor - we placed it just under four feet from the floor.
- At least 1 inch from the right wall - we placed it 4 inches from the wall
Checking critical measurements:
It is very important that the exhaust vent and air intakes can be installed between the floor joints at the proper clearance and exit locations. So we made sure that the heater was located properly in that regard.
Don't forget the drywall!
Unless you are installing your heater in a utility room, where you tend not to finish the walls with drywall, be sure to install drywall before the heater. We installed drywall on an addition wall adjacent to the tank because, although it did not have any thing to be installed on it (yet), we believed it would be difficult to install the drywall once the heater was in place. Order of building is everything!
COMING: I will discuss and share my experiences in the installation of the tankless water heater in later posts.
5 More Rules for Installing Tankless Water Heaters
There are lots of rules - but for good reason - to keep you alive!
 Install Heater with Lots of Elbow Room. You can place the heater in a closet but remember you need to keep it free from anything within 2 feet of the front and 1 foot on each side plus clear air above it. Not only to you not want anything flammable leaning against it you need room to service it. You should place the unit at eye level so that it is easy to service.
- Use Category III Stainless Vent Pipe: Treat the exhaust pipe like any other chimney - after all it is a chimney with lots of hot exhaust gases going up it. In my opinion Z-Flex makes the best and easiest to use Cat III SS Vent Pipe.
 Follow All the Rules for Black Gas Pipe installation: Key rules include: a shut off valve at each appliance, sediment trap (drip leg), do not under-size the pipe (use 3/4 inch pipe); be sure to test for leaks!; and use flex pipe to connect appliances to the black pipe (this isolates movement, hence, potential leaks).
 Follow the Instructions for Connecting to the Water system: The critical things are a relief value on the hot water side of the heater and water shutoff on both sides of the heater - one for hot one for cold. Also if you are using the newer plastic pipe for your water system, you should not connect it directly to the heater - most suggest a buffer of 2-3 feet of copper pipe. You also need a drain near by where the relief valve can drain and where you can drain the water to when winterizing the cottage.
 Use Clean Water: This is especially important for the Cottage. Be sure to install all your water purification systems in the line before the heater.


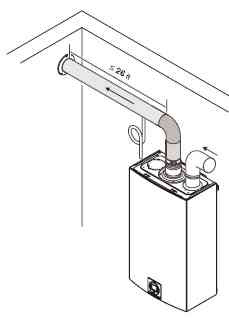
11 Rules for Venting a Tankless Water Heater (Gas)
 As I discovered there are many rules as to where you can not install the exit of an exhaust vent for a tankless water heater. These, as much as any other criteria, really determine the ultimate installation location of the heater.
- Terminating an exhaust vent under a deck is not permitted - this is the one that really hurt us!
- 36 in (twin pipe installation) directly below or 12 in horizontally from an opening; operable windows, doors and any non-mechanical fresh air openings
- 24 in below a gutter, sanitary pipework or eaves or12 in where they are protected by metal shielding
- 12 in from any internal corner or external corner
- 12 in above ground or snow pack
- 7 ft Above a paved sidewalk
- 24 in from an opposing wall or structure facing the vent termination
- 60 in from the relief valve of a gas regulator
- 48 in from a vent terminator facing another vent terminator or 60 in vertically between two exhaust vent terminators on the same wall or 36 in Horizontally between two exhaust vent terminators on the same wall
- 36 in horizontally and vertically from combustion air inlet of a twin pipe system
- 6 ft From the gravity combustion air inlet any other equipment
6 Criteria for Sellecting a Tankless Water Heater
 The are a six key considerations when selecting the right size and type of tankless water heater:
- Hot Water Requirements: Your hot water requirements are directly proportional to the number of people in the cottage at the same time and your normal usage of water. For instance, do you wish to have two people showering at the same time (in different showers....), or will you have a dishwasher, and other appliances that need hot water. Generally speaking a shower need about 3 to 4 gallons per minute of hot water. So for two showers your water heater needs to supply about 7 gallons per minute. The more capacity needed the more expensive.
- Single Application versus Whole House: Do you only need to supply hot water to a single appliance, or do you have two or more locations (kitchen, bathroom, laundry room, etc...) that need hot water. There are single application tankless water heaters that would fit in a cabinet in a bathroom that can be dedicated to providing hot water to the shower only. But for most needs a whole house water heater is the ticket - that would be installed in the basement.
- Heat Source (Electric versus Gas): Electric is a bit more convenient as it required no venting, however, it requires a high AMP circuit, often 120 AMPs, and even the largest of residential systems can not provide enough water for one application. Furthermore, it is recommended that they be install close tot he electrical panel. Gas while more complex just simply provide more hot water and are a bit cheaper to run.
- Heat Source (Natural Gas versus Propane): At the cottage it is like you will have no access to natural gas so the choice will be propane. Just be sure to order the LP or propane version - the natural gas model won't work properly with propane.
 Venting Type - Open combustion installation (SINGLE PIPE SYSTEM) versus Room sealed installation (TWIN PIPE SYSTEM): In an open combustion installation only the exhaust vent is installed to the outside - the system pulls in air from the room the heater is installed. For smaller systems this may not be a problem but for larger systems - like the 2400ES that we are using - it requires a room the size of entire single floor - which we don't have. PLUS you can't use the single pipe system in a region which has cold climate - which we do. Twin pipe systems usually come with a direct air vent system that uses an internal fan to pull in and push out the air. Quite frankly I feel safer with the direct vent two pipe system!
- Venting Location (Vertical versus Horizontal): The exhaust and air intake can either be routed vertically through the roof or horizontally through an adjacent wall. Which you do depends on a number of factors but the key ones are: location of the heater, the acceptability of the exit point per building code. We used a vertical vent for the exhaust and a horizontal for the intake because 1) you can not vent under a deck - and our deck goes almost completely around the cottage, 2) we wished to place the unit centrally to serve all locations equally, 3) the one wall that was available we did not wish to place the heater there


5 Reasons to Use Tankless Water Heaters
 We have decided to use a tankless water heater to supply hot water to the Cottage. The reasons were very simple and logical:
- Small footprint: A tankless water heater is much smaller that an equivalent water heater - in fact they just hang on a wall.,
- Inexpensive to run: Because there is no tank of water to continuously keep hot, you are not paying to heat water when you aren't using it.
- Instant and endless hot water: The model we got, a Bosch 2400ES, provides water for two major applications. It will keep providing hot water forever or until our propane tank runs out of gas... So nice long showers are possible.
- Easy to Install: It is no harder to install than a tank water heater, in fact perhaps a bit easier, as it is just hung on a wall, and could go just about anywhere.
- Easy to Winterize: Because there is no water tank winterizing is easy. Draining the water pipes also drains the water heater. Plus there isn't 40 gallons or more to drain - just the water in the pipes.
Framing the Basement... Status
 The massive amount of rain in the month of July caused me to change the order of construction activities. Not able to work outside, I moved the framing of the walls in the basement much early in the schedule. In fact I had thought that it was a task that I would leave to next spring - concentrating solely on getting the main floor completed. But with time on my hands, I ordered more 2x4 lumber and framed the basement walls.
In the basement there will be:
- 2 bedrooms
- a laundry closet (in one of the bedrooms)
- a utility room, and
- a bathroom
Given that it was the basement with 8 inch concrete walls I chose to construct 2x4 walls. Remember that the walk-out side of the basement has already been framed using 2x6 pressure-treated lumber - it is not a concrete wall.
I am realizing some benefits of completing the framing:
- I can now have my electrical contractor install the electrical in the entire house now, saving a second trip and money
- I realize now that I would have had to put up a few walls anyway to hold the electrical service, the tankless water heater, and the water pressure tank.
- I now can better plan for the routing of the plumbing from the main floor in the basement ceiling.
Subscribe to:
Posts (Atom)